HERE WE ARE GOING TO SEE HOW TO CREATE A MINI PROJECT IN DATABASE MANAGEMENT SYSTEM
Before straightly going inside the project let's we know about it.
Now we are going to see how to create a mini project in the DBMS using DOT NET through VISUAL STUDIO IDE.
Using this we are going to create an windows application.We can create all types of application such as android application, windows applications, etc..
Just install the MICROSOFT VISUAL STUDIO.[IF YOU NEED JUST BRING A PENDRIVE .YOU CAN GET IT FROM US]
Here I had installed visual studio 2008.After installing we can find our PC screen as shown above.
*click FILE->NEW->PROJECT
you can find the screen as shown below.
* Now your screen will be got changed as shown below:
Before straightly going inside the project let's we know about it.
Now we are going to see how to create a mini project in the DBMS using DOT NET through VISUAL STUDIO IDE.
Using this we are going to create an windows application.We can create all types of application such as android application, windows applications, etc..
Just install the MICROSOFT VISUAL STUDIO.[IF YOU NEED JUST BRING A PENDRIVE .YOU CAN GET IT FROM US]
Here I had installed visual studio 2008.After installing we can find our PC screen as shown above.
*click FILE->NEW->PROJECT
you can find the screen as shown below.
* Then a new window will appear, there select visual c# [c sharp] at the left corner and select windows below it and at the templates select windows forms application and click on OK button.As shown below.
Here whatever we find inside is said to be a CONTROL.
FORM1 is also a CONTROL,if we insert a text box then it also will said to be a CONTROL.
*If you were unable to see the options as SOLUTION EXPLORER and PROPERTIES don't worry.There are the few steps.
*click on VIEW on the top of the page.It will be looking like as shown below.
Here we can see some important features alone.
(i)Toolbox
(ii)Properties
(iii)Server explorer
(iv)Error list
Let's see one by one:
(i) Toolbox
By selecting view->Toolbox ,we will be find a dialogue box as shown.Here right click on the toolbox it will show option as AUTO HIDE if u select this as shown below, it will display in left side of the dialogue box as shown below.
using this toolbox we can insert BUTTON, CHECKBOX, LABEL, LIST BOX AND SO ON...
*HOW TO INSERT A TOOLBOX FEATURE INTO FORM1:
It is a simple way that just drag and drop inside the form1 control.
(ii)Properties
Here we can change the name of the label so that we can identify what should be entered in that title box.
And for button we can use words like SUBMIT,NEXT,OK AND SO ON..
Here in above image if we click on button and if we view properties means there in that we can find the TEXT option.Here in that position there it is named button1. we can change it by changing the name in properties as shown below.
(iii)Server explorer
It is used to connect our oracle database with our project.We can also connect MY SQL (or) SQL server.
Click on server explorer, then Right click on the Data connections then select add connecton and then add Oracle Database (OracleClient) then click ok.
By connecting here itself we can see our tables and its attributes and also sequences, functions,etc as shown below.
(iv)Error list
Here using this error list we can find whether the error is there or not.Here the error will get displayed if there is presence of any errors.If there is no error means this list will be looked empty.
How to make a connectivity between our oracle table with DOT NET for our project...?
*Just DOUBLE click on button as i had inserted early.
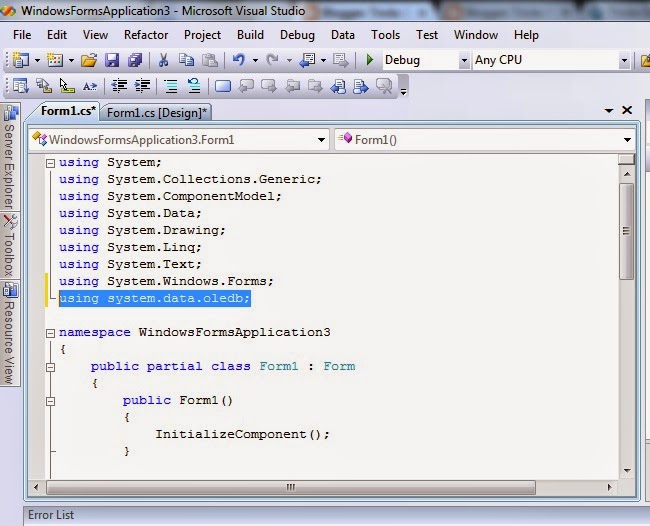
*There form1 design will be getting opened.Here just below the
using System.Windows.Forms; type the sentence
using system.data.oledb; so that here by this command we can access the oledb package which will be used instead of several large commands.

In system.data.oleb there four process should takes place.They are
1.CONNECTION ESTABLISHMENT,
2.CONNECTION OPEN,
3.EXECUTION OF QUERIES,
4.CONNECTION CLOSE.
1.Connection establishment:
Here first we want to create a connection so for that we will be using the strings.
The below code will be used for the connection establishment
OleDbConnection conn = new OleDbConnection("PROVIDER=MSDAORA;Data Source=orcle;User ID=system;Password=gowdham;Unicode=True");
Before doing this include command given below as underlined.
Then the command used for connection establishment is
OleDbConnection conn = new OleDbConnection("PROVIDER=MSDAORA;Data Source=orcle;User ID=system;Password=gowdham;Unicode=True");
The line in blue show be copied from your system as given below
2.CONNECTION OPEN
OPEN THE CONNECTION BY GIVING THE COMMAND
conn.Open();
3.EXECUTION OF QUERIES
WE CAN EXECUTE OUR QUERIES THROUGH STRINGS AS BELOW
OleDbCommand cmd = new OleDbCommand("INSERT INTO BORROW VALUES('"+textBox1.Text+"','"+textBox2.Text+"',SYSDATE,' ')", conn);
HERE TEXTBOX1 IS THE VALUE GIVEN IN TEXTBOX1 AND TEXTBOX2 IS GIVEN IN THAT TEXTBOX2
4.CONNECTION CLOSE
CLOSE USING THE COMMAND
conn.Close();
IF YOU WANT TO DISPLAY ANY CONTENT WHILE FINISHING IT CAN BE GIVEN AS BELOW
MessageBox.Show("RECORDS INSERTED SUCCESSFULLY");
THE ABOVE WILL BE FOR BUTTONS AND TEXTBOX
FOR GRID VIEW
THE FOLLLOWING COMMANDS WILL BE USED
THE FOLLLOWING COMMANDS WILL BE USED
OleDbConnection conn = new OleDbConnection("PROVIDER=MSDAORA;Data Source=orcle;User ID=system;Password=gowdham;Unicode=True");
conn.Open();
DataSet ds = new DataSet();
OleDbDataAdapter adapt = new OleDbDataAdapter("SELECT * FROM BORROW", conn);
adapt.Fill(ds);
conn.Close();
dataGridView1.DataSource = ds.Tables[0];
TO CREATE A REPORT SELECT WINDOWS CRYSTAL VIEWER FROM TOOLBOX, THEN RIGHT CLICK ON THE PROJECT SELECT ADD->NEW ITEM ->REPORTING->CRYSTAL REPORT
NOW A REPORT HAD BEEN CREATED


No comments:
Post a Comment