15 Dec 2014

BLOCK WEBSITE USING INTERNET EXPLORER

You can block a site by using Internet Explorer 5 or Higher Version Follow the instructions given  below :

1. Open your Internet explorer
2. Click Tools 
3. Click Internet Options
4. Click the Privacy tab
5. Under the Privacy window, Click Sites
6. Type in the site address that you want to Block and Click OK. Remember this
 technique only blocks on one site at a time. Parental control software will allow
 you to block multiple sites and categories.

9 Nov 2014

Removing Shortcut ''Virus'' using ''CMD''

How to remove Shortcut virus
using cmd ?

The Shortcut viruses are those
which converts all your data from
your pen drive or Hard disk to
shortcuts, but they are recoverable.
just follow the below given steps to
remove shortcut virus from pen drive
and recover back your files.

*Go to Start -> Run -> cmd. 
*Go to your pen drive directory. 
*Type this command: del *.lnk and
press Enter. 
*Type attrib -h -r -s /s /d e:\*.*
And then press Enter.

Recover your files :

You can recover your files through
Winrar.

1. Open WINRAR Application.
2. Navigate to your Pendrive
location or PC Folder location.
3. Copy Files and Paste where you
want.
4. Format your Pendrive.

Got some Files in your pen drive but
they are empty! Because of the virus
in your pendrive malfunctions your
drive. How to remove this empty
folder virus and recover files? Follow
the steps given below.

*Start -> Run -> cmd. 

*Type this command: attrib -h -r -
s /s /d x:\*.* 

*Here the letter “x” should be
replaced with the drive alphabet
of your pendrive that you have
inserted into the computer.

*If your pendrive shows the drive
alphabet as “J”, then type this
command: attrib -h -r -s /s /d j:
\*.* And then press Enter.

*Restart your Pc for the changes to
take place…

So these were some
methods to find and remove different
viruses using Command Prompt. I
hope this will help many of my
Readers...!!

10 Oct 2014

Tricks to create a MiNi project

         HERE WE ARE GOING TO SEE HOW TO CREATE A MINI PROJECT IN DATABASE MANAGEMENT SYSTEM

    Before straightly going inside the project let's we know about it.

    Now we are going to see how to create a mini project in the DBMS using DOT NET through VISUAL STUDIO IDE.
  
    Using this we are going to create an windows application.We can create all types of application such as android application, windows applications, etc..

    Just install the MICROSOFT VISUAL STUDIO.[IF YOU NEED JUST BRING A PENDRIVE .YOU CAN GET IT FROM US]


  Here I had installed visual studio 2008.After installing we can find our PC screen as shown above.

   *click FILE->NEW->PROJECT
you can find the screen as shown below.

    * Then a new window will appear, there select visual c# [c sharp] at the left corner and select windows below it and at the templates select windows forms application and click on OK  button.As shown below.

 * Now your screen will be got changed as shown below:

Here whatever we find inside is said to be a CONTROL.
FORM1 is also a CONTROL,if we insert a text box then it also will said to be a  CONTROL.

    *If you were unable to see the options as SOLUTION EXPLORER and PROPERTIES don't worry.There are the few steps.
    *click on VIEW on the top of the page.It will be looking like as shown below.
Here we can see some important features alone.
(i)Toolbox
(ii)Properties
(iii)Server explorer
(iv)Error list

Let's see one by one:
(i) Toolbox
By selecting view->Toolbox ,we will be find a dialogue box as shown.Here right click on the toolbox it will show option as AUTO HIDE  if u select this as shown below, it will display in left side of the dialogue box as shown below.
using this toolbox we can insert BUTTON, CHECKBOX, LABEL, LIST BOX AND SO ON...

*HOW TO INSERT A TOOLBOX FEATURE INTO FORM1:
It is a simple way that just drag and drop inside the form1 control.

 (ii)Properties
Here we can change the name of the label so that we can identify what should be entered in that title box.
And for button we can use words like SUBMIT,NEXT,OK AND SO ON..


  Here in above image if we click on button and if we view properties means there in that we can find the TEXT option.Here in that position there it is named  button1. we can change it by changing the name in properties as shown below.
(iii)Server explorer
It is used to connect our oracle database with our project.We can also connect MY SQL  (or) SQL server.
Click on server explorer, then Right click on the Data connections then select add connecton and then add Oracle Database (OracleClient) then click ok.


Enter your server name, user name ,password then click on OK button.

By connecting here itself we can see our tables and its attributes and also sequences, functions,etc as shown below.


(iv)Error list
Here using this error list we can find whether the error is there or not.Here the error will get displayed if there is presence of any errors.If there is no error means this list will be looked empty.

How to make a connectivity between our oracle table with DOT NET for our project...?
*Just DOUBLE  click on button as i had inserted early.

*There form1 design will be getting opened.Here just below the 
using System.Windows.Forms; type the sentence 
using system.data.oledb; so that here by this command we can access the oledb package which will be used instead of  several large  commands.
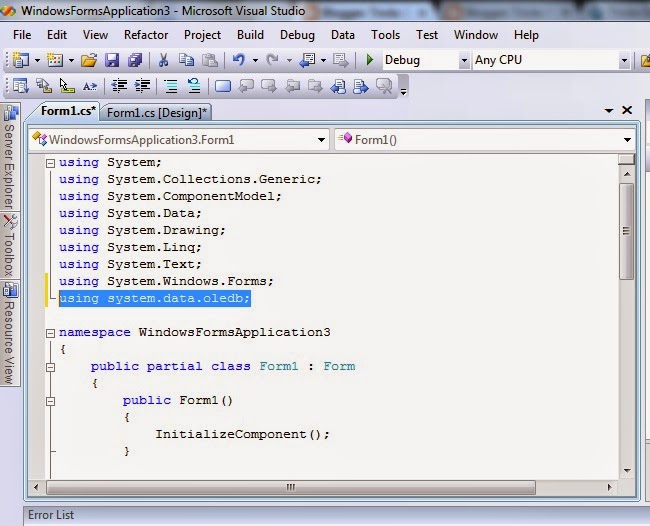
In system.data.oleb there four process should takes place.They are 
1.CONNECTION ESTABLISHMENT,
2.CONNECTION OPEN,
3.EXECUTION OF QUERIES,
4.CONNECTION CLOSE.


1.Connection establishment:
    Here first we want to create a connection so for that we will be using the strings.
   The below code will be used for the connection establishment
OleDbConnection conn = new OleDbConnection("PROVIDER=MSDAORA;Data Source=orcle;User ID=system;Password=gowdham;Unicode=True");

Before doing this include command given below as underlined.
Then the command used for connection establishment is 
OleDbConnection conn = new OleDbConnection("PROVIDER=MSDAORA;Data Source=orcle;User ID=system;Password=gowdham;Unicode=True");

The line in blue show be copied from your system as given below

2.CONNECTION OPEN
   OPEN THE CONNECTION BY GIVING THE COMMAND
conn.Open();

3.EXECUTION OF QUERIES
    WE CAN EXECUTE OUR QUERIES THROUGH STRINGS AS BELOW

OleDbCommand cmd = new OleDbCommand("INSERT INTO BORROW VALUES('"+textBox1.Text+"','"+textBox2.Text+"',SYSDATE,' ')", conn);

HERE TEXTBOX1 IS THE VALUE GIVEN IN TEXTBOX1 AND TEXTBOX2 IS GIVEN IN THAT TEXTBOX2

4.CONNECTION CLOSE
CLOSE USING THE COMMAND
conn.Close();

IF YOU WANT TO DISPLAY ANY CONTENT WHILE FINISHING IT CAN BE GIVEN AS BELOW 

MessageBox.Show("RECORDS INSERTED SUCCESSFULLY");


THE ABOVE WILL BE FOR BUTTONS AND TEXTBOX 

FOR GRID VIEW

THE FOLLLOWING COMMANDS WILL BE USED 
OleDbConnection conn = new OleDbConnection("PROVIDER=MSDAORA;Data Source=orcle;User ID=system;Password=gowdham;Unicode=True");
            conn.Open();

            DataSet ds = new DataSet();

            OleDbDataAdapter adapt = new OleDbDataAdapter("SELECT * FROM BORROW", conn);
            adapt.Fill(ds);
            conn.Close();

            dataGridView1.DataSource = ds.Tables[0];


TO CREATE A REPORT SELECT WINDOWS CRYSTAL VIEWER FROM TOOLBOX, THEN RIGHT CLICK ON THE PROJECT SELECT ADD->NEW ITEM ->REPORTING->CRYSTAL REPORT

NOW A REPORT HAD BEEN CREATED


4 Oct 2014

Creating a nameless folder

How To Make Nameless Folder ?

Before attempting this trick, try to
make a
folder with no name and you will
fail to do so.

This is what this trick will let you
do.....!

Creating nameless folder
Make a Newfolder on desktop or
where ever
you want.

Right click on this newly created
folder and
select Rename.
Erase the text showing "New
Folder".
Now keep Pressing Alt (i.e alter
key) and type
255. If you are on laptop then you
need to
enable your Num Lock and type
from the
highlighted number keys not from
those below
function keys.
After that leave alt key and Press
enter.

Done ! You just created nameless
folder.

2 Oct 2014

Time taken for Hackers to hack

TIP to KNOW

Prefer saftier one after reading this post

How Fast can a Hacker's Computer Guess your password?

-If your password is

* 6 Lowercase letters : 10 minutes
* 7 Lowercase and upper case letters : 23 Days
* 8 Lower,upper case,numbers and
symbols: 463 years

So, choose your password wisely and make it safe.........!

1 Oct 2014

How anti-virus software detects virus ?

How Does Anti virus detects
viruses?

I hope you know what is computer
Anti Virus.
But you may not know how the anti
virus
works. Here i am sharing how the
antivirus
software works.

* What you know about Anti Virus
software?
Antivirus software gives protection
against the
viruses and Malware. Antivirus can
detect the
malicious software ,then delete or
put it in
quarantine.

# The process behind the Anti Virus
The Antivirus follows two methods
to detect the
malicious software.
They are,

* Virus Dictionary Based Detection
* Suspicious Activity Detection

1.Virus Dictionary Based Detection :

In this method, Antivirus manage a
dictionary
file which has the identified virus
signatures.
Whenever an executable is running,
antivirus
will check the executable file
source code with
the dictionary. If the source code
match with
any virus signature, then antivirus
will
immediately inform you that the
virus is found.
Antivirus will check the executable
file whenever
file is opened or created or emailed
or
downloading.

Example:
Let us assume the malicious code
is
"11010011" and this code is in
dictionary file. If
any executable file runs with the
above
malicious code, the antivirus
immediately block
and alerts the user.
Day to day the hackers can create
new viruses,
the source code of virus will vary.
The antivirus
can not detect the virus with old
Signature of
viruses. You have to update the
virus signature
so that it can detect new viruses.

Drawback of this Method

Hackers found a hacking trick to
bypass this
security method, The Crypter. Yes,
hackers can
encrypt the source code into
different source
code such that it will look like
safest source
code. So if the antivirus checks for
the source
code, it won't find the malicious
code (because
it is another form).
The drawback can be solved by
including the
crypted malicious code to
dictionary file.

2.Suspicious Activity Detection :

The suspicious activity detection
method is
more effective than the Dictionary
based
approach. It can detect even a new
virus.
Antivirus observes the behavior of
the
executable file. If the executable
file does any
illegal process or create any
executable file, the
antivirus will block the executable
file and alert
the user .

Drawback

It is annoying process. The
accuracy is less so
it may detect any safe executable
file as virus.

Tricks on Google

Tricks to try in Home page of Google :

1. Google Gravity (Google
Magic) :

Open any web browser
(Google Chrome). Type
“ Google Gravity “ into the
search query bar then click
on I’m Feeling Lucky button.
Watch the Google home page
to come crashing down to
the bottom. Try this as a trick
on friends or family that They
may believe they broke
Google’s website. Click any
of the elements, move your
cursor and release them.
When you search “Flowers”
into query bar then all results
show in gravity.
Experience: Amazing Google
Gravity effects via elgooG .

2. Google Sphere :

Google Sphere will have to
type into the query bar, then
please click on the I’m
Feeling Lucky button. You
will see all the elements that
are circulating in the shape
of spheres. When you will
search in the search bar, they
will also circulate in the
shape of spheres. Normal
photos show just a single
viewpoint while photo
spheres.

3. Google Rainbow :

Google Rainbow will have to
type into the query bar, then
please click on the I’m
Feeling Lucky button. The
color pattern of a rainbow is
different from a spectrum.
Newton originally (1672)
divided the spectrum into
Seven main colors: Red,
Orange, Yellow, Green, Blue,
Indigo, Violet. All elements of
Google appear as a rainbow.

4. Google Epic :

Google Epic will have to type
into the query bar, then
please click on the I’m
Feeling Lucky button. All the
elements seem to be larger
and larger. When You search
“Toy” / “Flowers” after that
click on I’m Feeling
EXCESSIVE, Open online or
branded official websites.

5. Google Hacker :

Ever wondered what Google
would look like if it was
hacked? Google Hacker can
give you an idea of such a
scenario.
In Google hacker tricks, all
elements change into
numbers, alphabets and
special characters. You can
also search ( Google
l33t/1337 ) into query bar and
click I’m Feeling Lucky
button.

Www.tricksout.blogspot.in

VIDEOS IN BLOG?

   Are you feeling difficult to upload videos... 
you don't have any ideas to do it?
   It is a simple process we can do it easily.. 


     Blog is a initiative of an website.Where we can expose our views and ideas through this free site.Inserting videos,images,audios everything can be done easily.

 DO YOU WANT TO KNOW HOW TO INSERT AN IMAGE IN YOUR BLOG POST.IT IS VERY SIMPLE AND EASY PROCESS JUST FOLLOW BELOW STEPS:

  • JUST CLICK ON NEW POST
  • JUST START TYPING YOUR POST
  • CREATE THE POST, AND IF YOU NEED TO INSERT AN VIDEO, IT CAN BE DONE EASILY.
  • CLICK ON THE INSERT VIDEO ICON THERE ABOVE AS SHOWN BELOW:
    steps to insert videos in blog

  • AFTER CLICKING A SMALL NEW TAB WILL GET OPEN.IN THAT SELECT THE OPTION FROM WHICH YOU GOING TO UPLOAD AN VIDEO.
  • IT WILL TAKE TIME TO GET UPLOAD, THEN CLICK ON ADD SELECTED.
  • YA. HERE YOUR VIDEO IS SUCCESSFULLY UPLOADED INTO YOUR POST.
  • JUST ENJOY BY WATCHING THE VIDEO BELOW.

29 Sept 2014

How to insert a image in a post in your BLOG?

          BLOG IS A PERSONAL WEBSITE OR WEB PAGE IN WHICH AN INDIVIDUAL CAN POST OR SHARE THIER IDEAS ON A REGULAR BASIS.IT WILL BE A VERY USE FULL AND EFFECTIVE ONE TO EXPOSE THIER IDEAS.

      TILL YOU DIDN'T CREATE A BLOG? 

       DON'T WORRY JUST WATCH YOU TUBE VIDEO BY CLICKING BELOW.


CLICK HERE TO WATCH YOU TUBE VIDEO

         DO YOU WANT TO KNOW HOW TO INSERT AN IMAGE IN YOUR BLOG POST.IT IS VERY SIMPLE AND EASY PROCESS JUST FOLLOW BELOW STEPS:

  • JUST CLICK ON NEW POST
  • JUST START TYPING YOUR POST
  • CREATE THE POST, AND IF YOU NEED TO INSERT AN IMAGE, IT CAN BE DONE IN TWO WAYS.
  • CLICK ON THE INSERT IMAGE ICON THERE ABOVE AS SHOWN BELOW:
  • AFTER CLICKING A SMALL NEW TAB WILL GET OPEN.IN THAT SELECT THE OPTION FROM WHICH YOU GOING TO UPLOAD AN IMAGE.
  • ANOTHER WAY IS THERE TO INSERT AN IMAGE IS THAT. RIGHT CLICK AND SELECT COPY IMAGE AND JUST PASTE IT HERE.
  • NOW YOUR IMAGE WILL BE UPLOADED IN YOUR POST

STAY TUNED 


Windows 8 keyboard Shortcuts

ABOUT WINDOWS 8 :
          Windows 8 is a personal computer operating system developed by Microsoft .


SHORTCUTS:
  • Windows keySwitch between Modern Desktop Start screen and the last accessed application.
  • Windows key + C: Access the charms bar.
  • Windows key + Tab: Access the Modern Desktop Task bar.
  • Windows key + I: Access the Settings charm.
  • Windows key + H: Access the Share charm.
  • Windows key + K: Access the Devices charm.
  • Windows key + Q: Access the Apps Search screen.
  • Windows key + F: Access the Files Search screen.
  • Windows key + W: Access the Settings Search screen.
  • Windows key + P: Access the Second Screen bar.
  • Windows key + Z: Brings up the App Bar when you have a Modern Desktop App running.
  • Windows key + X: Access the Windows Tools Menu.
  • Windows key + O: Lock screen orientation.
  • Windows key + . : Move the screen split to the right.
  • Windows key + Shift + . : Move the screen split to the left.
  • Windows key + V: View all active Toasts/Notifications.
  • Windows key + Shift + V: View all active Toasts/Notifications in reverse order.
  • Windows key + PrtSc: Takes a screenshot of the screen and automatically saves it in the Pictures folder as Screenshot.
  • Windows key + Enter: Launch Narrator.
  • Windows key + E: Open Computer (Windows explorer).
  • Windows key + R: Open the Run dialog box.
  • Windows key + U: Open Ease of Access Center.
  • Windows key + Ctrl + F: Open Find Computers dialog box.
  • Windows key + Pause/Break: Open the System page.
  • Windows key + B: Select the first item in the Notification Area and then use the arrow keys to cycle through the items Press Enter to open the selected item.
  • Windows key + Ctrl + B: Access the program that is displaying a message in the Notification Area.
  • Windows key + T: Cycle through the items on the Task bar.
  • Windows key + M: Minimize all windows.
  • Windows key + Shift + M: Restore all minimized windows.
  • Windows key + D: Show/Hide Desktop (minimize/restore all windows).
  • Windows key + L: Lock computer.
  • Windows key + Up Arrow: Maximize current window.
  • Windows key + Down Arrow: Minimize/restore current window.
  • Windows key + Home: Minimize all but the current window.
  • Windows key + Left Arrow: Tile window on the left side of the screen.
  • Windows key + Right Arrow: Tile window on the right side of the screen.
  • Windows key + Shift + Up Arrow: Extend current window from the top to the bottom of the screen.
  • Windows key + Shift + Left/Right Arrow: Move the current window from one monitor to the next.
  • Windows key + F1: Launch Windows Help and Support.

FUNCTION KEY SHORTCUTS:

  • F1 : Display Help.
  • F2 Rename a file.
  • F3 : Open Search.
  • F4 : Display the Address Bar list.
  • F5 : Refresh display.
  • F6 : Cycle forward through elements in a window or dialog box.
  • F7 : Display command history in a Command Prompt.
  • F10 Display hidden Menu Bar.
  • F11 :Toggle full screen display.

OTHER KEYBOARD SHORTCUTS:

  • Tab: Cycle forward through elements in a window or dialog box.
  • PrtScn: Take a screen shot of the entire screen and place it in the clipboard.
  • Home: Move to the top of the active window.
  • End: Move to the bottom of the active window.
  • Delete:Delete the selected item.
  • Backspace: Display the previous folder in Windows Explorer.
  • Esc: Close a dialog box.
  • Num Lock Enabled + Plus (+): Display the contents of the selected folder.
  • Num Lock Enabled + Minus (-): Collapse the selected folder.
  • Num Lock Enabled + Asterisk (*): Expand all sub folders under the selected folder.
  • Press Shift 5 times : Turn Sticky Keys on or off.
  • Hold down right Shift for 8 seconds : Turn Filter Keys on or off.
  • Hold down Num Lock for 5 seconds : Turn Toggle Keys on or off.

Google Chrome Keyboard Shortcuts

ABOUT GOOGLE CHROME :
          GOOGLE CHROME IS A FREEWARE WEB BROWSER DEVELOPED BY GOOGLE.

Tab and window shortcuts:
  • Ctrl+N : Opens a new window.
  • Ctrl+T : Opens a new tab.
  • Ctrl+Shift+N : Opens a new window in incognito mode.
  • Press Ctrl+O ,then select file. Opens a file from your computer in Google Chrome.
  • Press Ctrl and click a link. Or click a link with your middle mouse button (or mouse wheel). Opens the link in a new tab in the background .
  • Press Ctrl+Shift and click a link. Or press Shift and click a link with your middle mouse button (or mouse wheel). Opens the link in a new tab and switches to the newly opened tab.
  • Press Shift and click a link. Opens the link in a new window.
  • Ctrl+Shift+T Reopens the last tab you have closed. Google Chrome remembers the last 10 tabs you have closed.
  • Drag a link to a tab. Opens the link in the tab.
  • Drag a link to a blank area on the tab strip. Opens the link in a new tab.
  • Drag a tab out of the tab strip. Opens the tab in a new window.
  • Drag a tab out of the tab strip and into an existing window. Opens the tab in the existing window.
  • Press Esc while dragging a tab. Returns the tab to its original position.
  • Ctrl+1 through Ctrl+8 Switches to the tab at the specified position number on the tab strip.
  • Ctrl+9 Switches to the last tab.
  • Ctrl+Tab or Ctrl+PgDown Switches to the next tab.
  • Ctrl+Shift+Tab or Ctrl+PgUp Switches to the previous tab.
  • Alt+F4 Closes the current window.
  • Ctrl+W or Ctrl+F4 Closes the current tab or pop-up.
  • Click a tab with your middle mouse button (or mouse wheel). Closes the tab you clicked.
  • Right-click, or click and hold either the Back or Forward arrow in the browser toolbar. Displays your browsing history in the tab.
  • Press Backspace, or Alt and the left arrow together. Goes to the previous page in your browsing history for the tab.
  • Press Shift+Backspace, or Alt and the right arrow together. Goes to the next page in your browsing history for the tab.
  • Press Ctrl and click either the Back arrow, Forward arrow, or Go button in the toolbar. Or click either button with your middle mouse button (or mouse wheel). Opens the button destination in a new tab in the background.
  • Double-click the blank area on the tab strip. Maximizes or minimizes the window.
  • Alt+Home : Opens your homepage in your current window.
Google Chrome shortcuts:
  • Alt+F : Opens the Tools menu, which lets you customize and control settings in Google Chrome.
  • Ctrl+Shift+B : Toggles the bookmarks bar on and off.
  • Ctrl+H : Opens the History page.
  • Ctrl+J : Opens the Downloads page.
  • Shift+Esc : Opens the Task Manager.
  • Shift+Alt+T : Sets focus on the first tool in the browser toolbar. You can then use the following shortcuts to move around in the toolbar:
  • Press Tab, Shift+Tab, Home, End, right arrow, and left arrow to move focus to different items in the toolbar.
  • Press Space or Enter to activate toolbar buttons, including page actions and browser actions.
  • Press Shift+F10 to bring up any associated context menu (e.g. browsing history for the Back button).
  • Press Esc to return focus from the toolbar back to the page.
  • Press F6 or Shift+F6 to switch focus to the next keyboard-accessible pane, where panes include the main web content, toolbar, and bookmarks bar (if visible).
  • Ctrl+Shift+J : Opens Developer Tools.
  • Ctrl+Shift+Delete : Opens the Clear Browsing Data dialog.
  • F1 Opens the Help Center in a new tab (our favorite).
Address bar shortcuts:
  • Type a search term, then press Enter. Performs a search using your default search engine.
  • Type a search engine keyword, press Space, type a search term, and press Enter. Performs a search using the search engine associated with the keyword.
  • Begin typing a search engine URL, press Tab when prompted, type a search term, and press Enter. Performs a search using the search engine associated with the URL.
  • Ctrl+Enter Adds www. and .com to your input in the address bar and open the resulting URL.
  • Type a URL, then press Alt+Enter. Opens the URL in a new tab.
  • F6 or Ctrl+L or Alt+D Highlights the URL.
  • Ctrl+K or Ctrl+E Places a ‘?’ in the address bar. Type a search term after the question mark to perform a search using your default search engine.
  • Press Ctrl and the left arrow together. Moves your cursor to the preceding key term in the address bar
  • Press Ctrl and the right arrow together. Moves your cursor to the next key term in the address bar
  • Ctrl+Backspace Deletes the key term that precedes your cursor in the address bar
  • Select an entry in the address bar drop-down menu with your keyboard arrows, then press Shift+Delete. Deletes the entry from your browsing history, if possible.
  • Click an entry in the address bar drop-down menu with your middle mouse button (or mousewheel). Opens the entry in a new tab in the background.
  • Press Page Up or Page Down when the address bar drop-down menu is visible. Selects the first or last entry in the drop-down menu.

Webpage shortcuts:


  • Ctrl+P : Prints your current page.
  • Ctrl+S : Saves your current page.
  • F5 or Ctrl+R : Reloads your current page.
  • Esc Stops the loading of your current page.
  • Ctrl+F : Opens the find bar.
  • Ctrl+G or F3 : Finds the next match for your input in the find bar.
  • Ctrl+Shift+G, Shift+F3, or Shift+Enter Finds the previous match for your input in the find bar.
  • Click the middle mouse button (or mouse wheel). Activates auto-scrolling. As you move your mouse, the page automatically scrolls according to the direction of the mouse.
  • Ctrl+F5 or Shift+F5 : Reloads your current page, ignoring cached content.
  • Press Alt and click a link. Downloads the target of the link.
  • Ctrl+U Opens the source of your current page.
  • Drag a link to bookmarks bar Saves the link as a bookmark.
  • Ctrl+D : Saves your current webpage as a bookmark.
  • Ctrl+Shift+D : Saves all open pages as bookmarks in a new folder.
  • F11 Opens your page in full-screen mode. Press F11 again to exit full-screen.
  • Ctrl and +, or press Ctrl and scroll your mouse wheel up. Enlarges everything on the page.
  • Ctrl and -, or press Ctrl and scroll your mouse wheel down. Makes everything on the page smaller.
  • Ctrl+0 Returns everything on the page to normal size.
  • Space bar Scrolls down the web page.
  • Home Goes to the top of the page.
  • End Goes to the bottom of the page.
  • Press Shift and scroll your mouse wheel. Scrolls horizontally on the page.

Text shortcuts:

  • Ctrl+C : Copies highlighted content to the clipboard.
  • Ctrl+V or Shift+Insert : Pastes content from the clipboard.
  • Ctrl+Shift+V : Paste content from the clipboard without formatting.
  • Ctrl+X or Shift+Delete : Deletes the highlighted content and copies it to the clipboard.